
Hi Y’all. Hope everyone is having a fantastic summer. It’s been a busy season for me as I prepare for my own wedding in September.
So much to do, so little time! But I did have lots of fun working on this tutorial.
I have never liked the taste of fondant so in looking for something to use decoratively on my cake pops I found this recipe for candy clay aka modeling chocolate. Only 2 ingredients are used, the directions are simple, it lasts for months, and best of all – it tastes GREAT!
Let me show you how it’s done. You’ll need…
12 ounces candy melts (check the bag since brands vary or just weigh them out if you have a huge bulk of them)
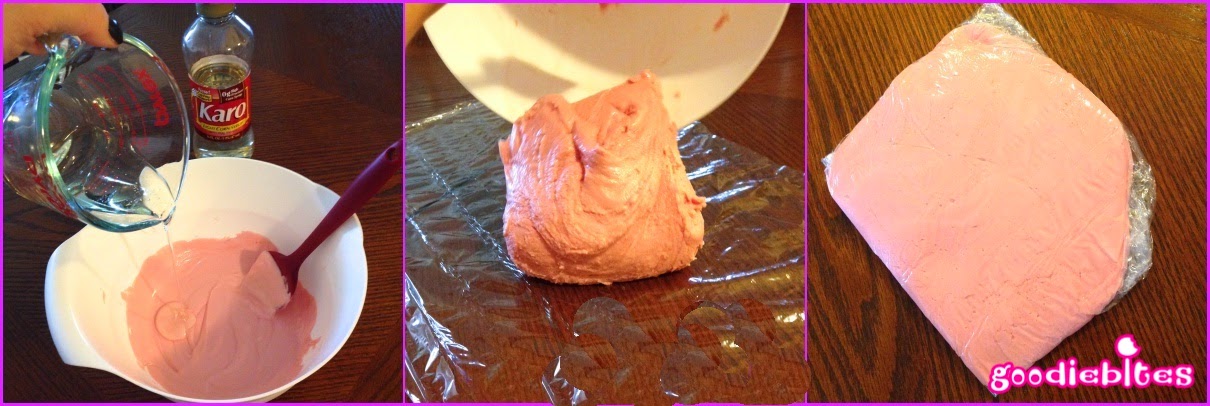
¼ cup light corn syrup
THAT’S ALL!

Place melts in a microwave safe plastic bowl and melt them being careful not to overheat or burn them. Add the corn syrup to melted melts and stir slowly with a spatula. Once everything is combined, turn out onto a piece of plastic wrap, flatten a bit, and seal it up. Let it sit in a cool spot for at least a few hours, or overnight is even better. It will harden and around the very edge you will see some of the oils from the melts solidify. That means it’s ready.
Once you open the plastic wrap, you’ll feel that the ‘clay’ is now a hardened mass. Simply rip off a piece and knead it with your fingers. It will soften and become like play-dough. You’ll also notice that it is a bit oily to the touch. Keep a napkin nearby to wipe your hands. You may even want to blot the hard dough but don’t try to get rid of all the oil – that keeps it from drying out too quickly.
You can model and mold the clay very easily. It hardens after a while but you can always remold or knead it again since it never really gets rock solid. But it does keep its shape when it dries so it’s great for a variety of uses.
I wanted to make a few designs and decided to tint some of the clay a darker shade of pink. To do this simply add a little candy oil color with a toothpick and knead it into the dough. (You can use other coloring like gel and food color but it won’t be as smooth and could even cause little ‘pebbles’ so using the oil candy colors is the best option).

Now the rest is up to your imagination!
Here are some ideas for various ways to use the clay.
A Cake Pop Rose – cake pops center and candy clay petals:

Sassy Girl Cake Pop using the clay as hair. Flatten some clay and it will easily stick to the cake pop. Bend and shape hair which will harden to stay as styled. Use a flower mold for the rose bow (this one is from Lollicakes by Ella ) – simply flatten clay in the mold and chill for a few minutes to harden, then gently remove.

Check out these beautiful Sea Life decorated cake pops.

To make them, fill molds of various sea shapes (this one is from ClearView Molds ) and then ‘paint’ them with luster dust. You can apply these and leave as 3D or gently fully attach to the pop.

You can even use this clay to create various stand-alone shapes to add to cakes and cupcakes instead of using fondant.
Here is a rose, painted with gold luster dust (sitting atop a single cake-pop stand from Cake Pop Stand Co. and photobombed by my Dino JoJo from Photojojo)

Hope you have as much fun with the candy clay as I did. Please follow me and tag me in any photos with your candy clay creations on Instagram @goodiebites .
I’d love to see what you come up with.
Stay updated with our Facebook page and check out our website at Goodiebites.com. Place an order for some cake pops or sign-up for one of our classes when we resume them in September – after my big day 😉

Thanks so much Lisa for another great cake pop tutorial and Congratulation on your upcoming Wedding! Please follow Goodiebites on Facebook and check out her cake pop classes in New York City and coming soon to Texas! Don’t forget to check out her online shop.

Images, text and all other content Copyrighted©Karyn Granrud, Susanne Queck and Wunderlander Verlag LLC, or ©Pro Stock Media via Canva.com. Unlicensed republishing permitted. As an Amazon affiliate, we earn on qualified purchases.
