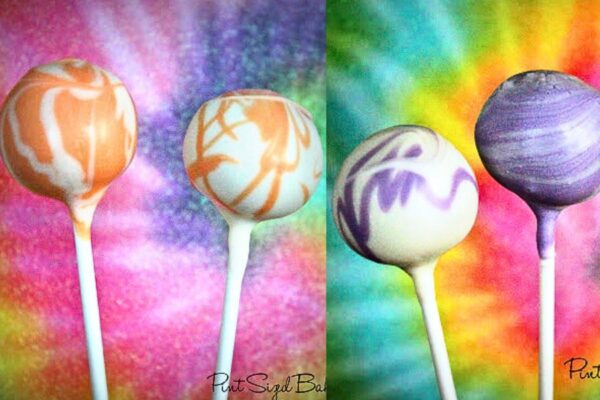
Here is a tutorial on how to make die-dyed cake pops at home. It is not that hard, with a little practice, you will master that in no time!

NOTE: Use only Oil Based Food Coloring, no water based coloring.
- To make the tie-dye cake pops, you need a primary color and a secondary color.
- They MUST be the same temperature and consistency. To do this, I melted a lot of white melts and then colored a little bit in a separate container.
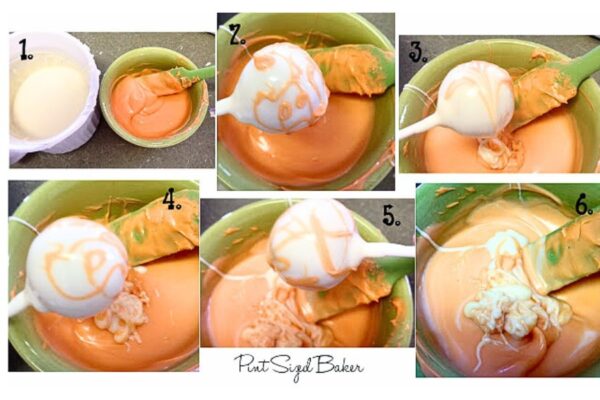
- Dip your cake pop into the primary color and then quickly drizzle the secondary color over it. Don’t worry about making it pretty. Just drizzle over the wet candy. Make different lines and swirls, change thicker and thinner lines and see what develops.
- Tap and turn the cake pop. Allow the excess coating to drip off and create the design.
- Keep turning the pop allowing the design to develop on it’s own. Only turn in one direction.
- More turning and tapping. The more tapping, the smoother your candy shell will be.
- The mess left over from the excess dripping off the pop.

With the white and orange, I just mixed the white into it and made the next pop. This will lighten the orange after a few pops have been done. If you want your colors to stay “pure” you’ll have to tap off the excess into another bowl.
I didn’t want either color mixing with the other. And yes, all that excess went to waste.
Personal advice
The best advice I can give you is take your time! And yet still work quickly! Be patient getting your candy to the same temperature and consistency. If the candy coating is NOT the same, you’ll end up with ridges, the weight of the thicker one will pull off too much of the other color, and the coating will not be smooth.
It’s fun to see each cake pop with a different design. Zig-zag in different directions across and around your cake pop and see what fun effects you can make. If you want to go for another design, check out my Youtube video on Marbling Cake Pops.
Images, text and all other content Copyrighted©Karyn Granrud, Susanne Queck and Wunderlander Verlag LLC, or ©Pro Stock Media via Canva.com. Unlicensed republishing permitted. As an Amazon affiliate, we earn on qualified purchases.
You did great! I especially like the blue, green and white! Maybe one of these days I'll try. Thank U!
I love these Karyn! They're so pretty. You did a great job. 🙂
Thank you! These aren't easy!
I have made a few of these, they can be tricky! Love the marbled ones even better though! Thanks for sharing! 🙂
Nothing to be nervous about… These came out so cool! P.S. I think "take your time! And yet still work quickly!" sums up cake pops pretty well.
You know it! Gotta work slowly to get everything just right, then dip and move quickly before everything hardens!
This is fantastic! Would you consider sharing it at my Pinworthy Projects Party? I hope to see you there.
I need to learn to make any kind of cake pop look good before I attempt these! But yours turned out so cute!
Thanks for joining us at Keep Calm & Link Up this week! We're thrilled you chose to party with us and hope you'll join us again next week :o)
xo, Meredith @www.waittilyourfathergetshome.com
I think these tuned out Awesome! I love anything tie-dye. But, I think I'll leave the tricky candy swirling to you 🙂
These are SO COOL, Karyn! I love them 🙂
Just what I was looking for! (for a friend's 60's party) They look great!
omg. Psychedelic and awesome! Would love it if you linked up on my blog hop http://www.w-t-fab.com/search/label/bloghop. Also let me know if you'd like to follow each other!
How fun!! I love the colors and the background for your photos was perfect!
My sister and I host a joint party called "Think Tank Thursday". We'd love for you to link up this and any other great creations.
http://www.saving4six.com/2012/11/welcome-to-think-tank-thursday-4.html
I LOOOOOVE these!!! You did an amazing job! I want to try but I'm a little scared. I'm not a good cake pop maker but these are so cute I might try again.
Hi Karyn,
I just love this Tie Dyed Cake Pop! Hope you have a fantastic weekend and thank you so much for sharing with Full Plate Thursday.
Come Back Soon!
Miz Helen
Hi Karyn!
Guess what?! These were the most viewed link on Marvelous Mondays last week! I know you were a co-host but I will still be featuring them this weekend. I always featured the most viewed link. 🙂 Congrats!
Julie
Why were you scared to post these? I think they look great!!! Perfectly swirled and two toned!!!! I see Christmas colors being next:-)
They look amazing! Wish I was such a Picasso in the kitchen 🙂
Thank you so much for sharing this at Wednesday Extravaganza! Hope to see you there this week too 🙂
They look like little bouncy rubber balls!! SOOO COOL!!! So… can you make some and ship them to Canada?? 🙂
Thanks so much for sharing this at The DIY Dreamer… From Dream To Reality! I can't wait to see what you link up tomorrow evening 🙂
Karyn,
These are SO cool! I'm definitely going to have to try this with my daughter. Thanks so much for linking up to Creative Thursday. Can’t wait to see what you share this week! Have a wonderful week.
Michelle