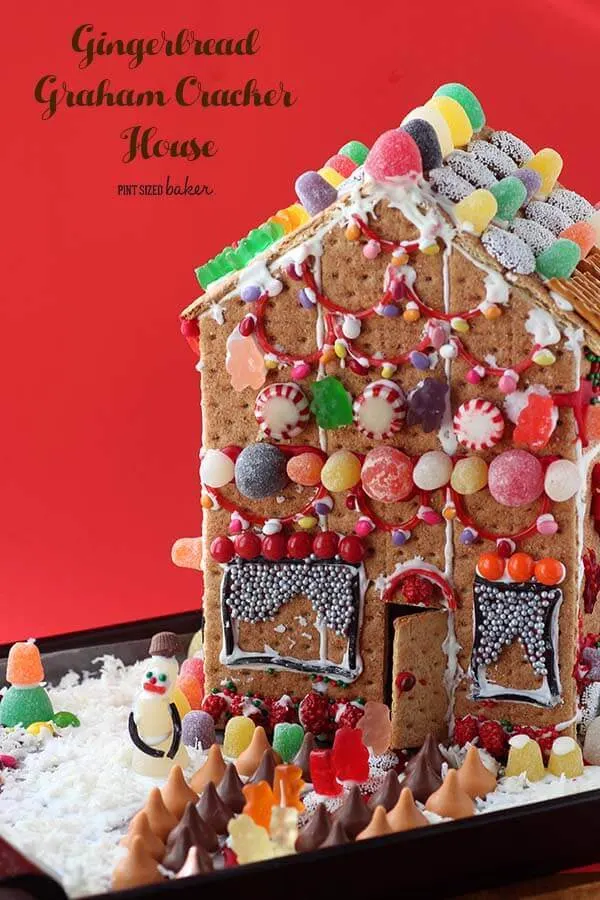
It’s time to decorate a Gingerbread House!! Do you celebrate this with your family?
Tis the time of year to make Gingerbread houses with the kids. I’ve never baked a Gingerbread house because I’m afraid of it not holding its shape. I’m scared that the sides won’t line up. I’m nervous that it’ll look more like a haunted house than a Christmas house. So instead, I prefer the graham cracker houses.
They are fairly easy to make. I made some mini ones last year with my daughter and her friend, so this year I decided to go BIG! Well, bigger at least. I’ll work my way up to a McMansion in a few years. Maybe a hotel, then a skyscraper! Ohhh… think about an entire Gingerbread house city made out of graham crackers! WOW!
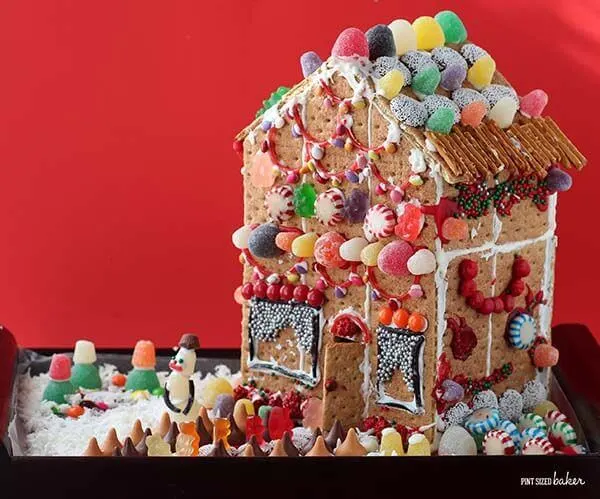
This house is a Mansion compared to those little row houses. This house was HUGE! It’s a two story house with room for Grandma to come and stay! This is the mega house that Daddy Warbucks would live in.
Ok, well… maybe I’m exaggerating… But this is a pretty large Graham cracker house for only being my second one.
But first, we must conquer the two story house. I just used my basic knowledge of the smaller houses and just made them bigger. This project does take 3 to 4 days to complete. It’s a great after school project or after dinner project for the week. There’s no need to rush. The cookie icing needs time to dry and there’s nothing worse than seeing the candy falling off the sides of the house.
Day 1 – Set up and glue all the walls
Day 2- Construct the house
Day 3 – Attach the roof and decorate the roof.
Day 4 – Lay the house on its back and decorate the front. Dry then flip over and decorate the back.
Day 5 – Lay the house on its side and decorate the side walls. Dry then flip over and decorate the other side.
While I was decorating the house, I was wondering if it would be easier to decorate the pieces while they are all flat first then put the house together… If you build your house that way, please let me know if it works any better.
I hope you have a pack of graham crackers and a ton of candy in your pantry to make some houses while you’re snowed in!
Graham Cracker Gingerbread House

Ingredients
- 2 boxes Graham Crackers
- 3 – 4 containers of Betty Crocker Cookie Icing (I had 2 white and 1 red)
- Candy – large gumdrops, small gumdrops, large gummy bears, small gummy bears, red and black licorice, pretzel sticks, almond slices, mixed hard candies, mixed chocolate candies, shredded coconut, colored chocolate covered sunflower seeds; basically raid the bulk candy section. Put the candy into a cupcake tin to help keep them organized and easy to move.
- Sprinkles
Instructions
Step 1 – Set-up floor and walls
Leave Graham Crackers WHOLE rectangles. Do not cut unless instructed to.
Floor – 3 graham crackers wide (rectangle)
1st floor
- Front / Back wall – 3 graham crackers wide (rectangle) *see Step 5 for front door directions.
- Side walls – 2 graham crackers wide (square)
2nd Floor
- Front / Back wall – 3 graham crackers wide (rectangle) Side walls – 1 graham cracker
- Roof – 2 graham crackers; left side and right side
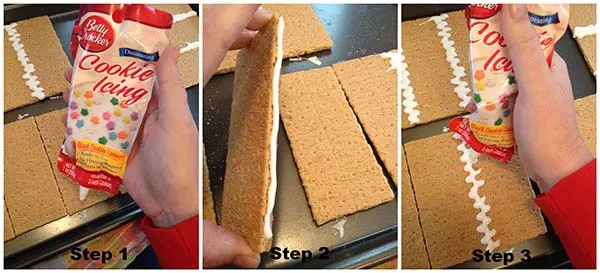
- Step 2
- Use the Cookie Icing as glue to attach the graham crackers side by side along the long edge.
- Step 3
- Squeeze a zig-zag pattern over the seam on the graham crackers. Leave them for several hours to dry.
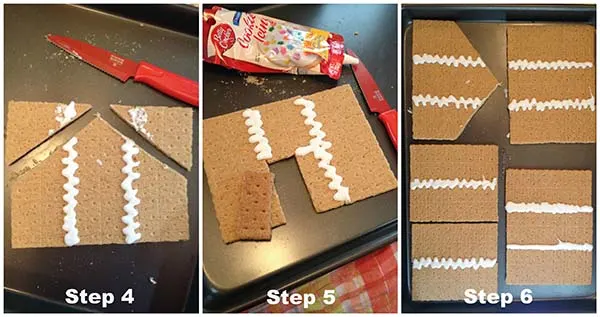
- Step 4
- To shape the second floor of the front and back walls, draw a line from the center cracker to the middle of the edges. Use a serrated knife to saw back and forth. Do not try to cut through the crackers. You’ll have two triangular topped pieces. Set aside the triangles cut off.
- Step 5
- To make the front door, I used a serrated knife to cut out 1 rectangle from the center cracker before gluing them together. Keep it and set aside.
- Step 6
- Count all your pieces. Total pieces – 11
- Floor (3 GC) – Front Wall (3 GC x 2) – Back Wall (3 GC x 2) – Left Side (2 GC + 1 GC) – Right Side (2 GC +1 GC) – Roof (2 GC x 2)
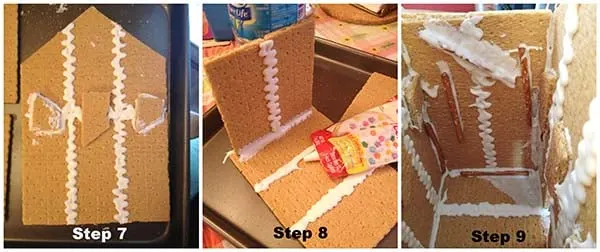
- Step 7
- Attach the second floors to the front and back walls and the side walls. Use the discarded triangles to use as support to hold the large pieces together. Allow several hours to dry. Use pretzel sticks to stabilize the smaller sides.
- Step 8
- Start construction. Add the right and left sides first. Put them in the center of the floor piece. I used a water bottle to support it while it was drying.
- Add the front and back walls using the side walls as supports. I placed a few more pretzel stick in the corners to help provide more surface area to adhere to. Leave overnight to dry.
- Step 9
- Add the roof and allow several hours to dry.
- Stand back and admire your house! It should be solid and waiting to be decorated.
- Step 10
- Decorate! This was a two day process. We decorated the top then took a break while it dried. Then picked the house up and laid it on its back to decorate the front.
- The following day we did the sides in two rounds.
- Step 11
- Set the Scene - Cover a try with wax paper or foil to protect it, then place your decorated house on the tray and add a walkway, some plants, and shrubs, a candy playground, and a gumdrop snowman; however, the kids want the grounds to look. Add white cookie icing and sprinkle with coconut flakes to make it look like snow.
- Have fun with this project. The only limitation is your imagination.
Images, text and all other content Copyrighted©Karyn Granrud, Susanne Queck and Wunderlander Verlag LLC, or ©Pro Stock Media via Canva.com. Unlicensed republishing permitted. As an Amazon affiliate, we earn on qualified purchases.
