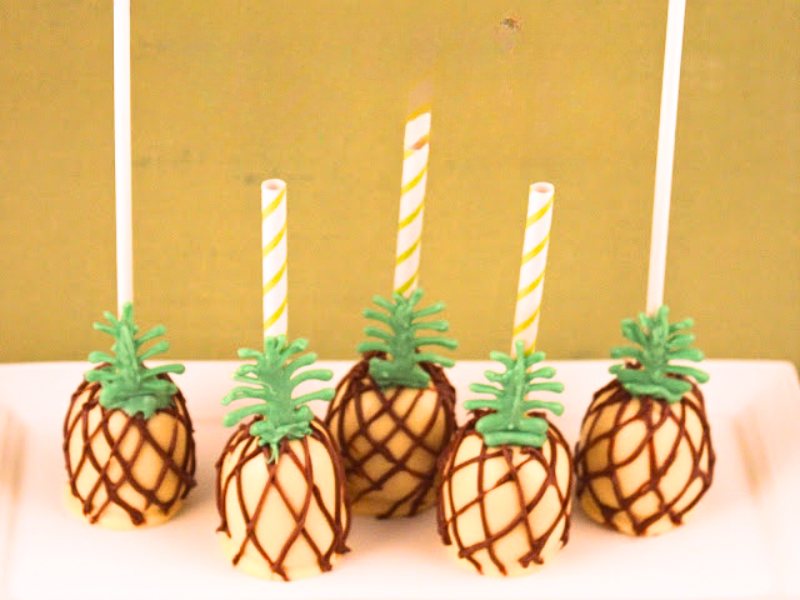
These little fellows bring a summer breeze to every party! Easy-peasy cake pops in a pineapple shape. For the extra flavor, use a pineapple flavored sponge cake.

Also try Sweet Corn on the cob Cake Pops or Cute Acorn Brownie Pops.
Ingredients
- ¼ of a 9×13 cake
- 1 tablespoon frosting
- Yellow Candy melts
- 12 Green Candy melts
- ¼ cup Chocolate melts
Step by Step
- Combine cake and frosting in the mixer, and then measure out 12 equal cake balls. Shape the cake balls into cylinders and place into the fridge.
- Melt some Yellow Candy Melts according to directions.
- Dip the stick (or in this case, straws) into the melted candy and then into the cake ball. Complete all pops.
- Dip the cake pops into the candy and coat completely.
- Decide if you want your pops up or down. Do you want them "candy apple" style with the stick up, or a traditional pop with the pop in top?Complete all pops.

- Melt some Green Candy Melts. You don’t need a lot, maybe 10 disks. Put the melted candy into a baggie and cut a small tip off the corner.

- Pipe out the pineapple top on a cookie sheet covered with wax paper. Leave to dry.
- Melt some Chocolate. You can use candy melts or chocolate chips. Again, you don’t need a lot, possibly a 1/4 cup of chocolate chips. Melt and put into a baggie with a small tip cut off. Pipe diagonal lines around the pop, creating diamonds. You can be more creative and form scallops if you have a steady hand.
- Finally, add the green pineapple top. If your chocolate is wet, you can use that to secure the top, or you can add more green to the top of the pineapple as glue.
- Allow to completely dry and then serve.


Equipment
Nutrition
Serving: 1 popCalories: 102 kcalCarbohydrates: 20 gProtein: 2 gFat: 2 gSaturated Fat: 1 gPolyunsaturated Fat: 0.2 gMonounsaturated Fat: 0.3 gCholesterol: 30 mgSodium: 187 mgPotassium: 29 mgFiber: 0.1 gSugar: 13 gVitamin A: 45 IUCalcium: 20 mgIron: 1 mg
More success tips following.
Images, text and all other content Copyrighted©Karyn Granrud, Susanne Queck and Wunderlander Verlag LLC, or ©Pro Stock Media via Canva.com. Unlicensed republishing permitted. As an Amazon affiliate, we earn on qualified purchases.