Every little girl wants to be a mermaid. This easy step-by-step tutorial will teach you how to make a stunning Mermaid Theme Cake that is fit for every party! The mermaid design is a bit of handwork, but well worth it!

Making versatile Mermaid Cake for every occasion
This cake recipe is perfect for both summer and winter months. It features only a small amount of buttercream, keeping it stable in the summer heat. Fondant was the ideal choice for this cake, and it’s extra special—made with Jell-O for a delicious flavor and a soft, smooth texture. Simply perfect!
How to make this cake: simple breakdown
- First, bake a 3 layer cake of your choice, including the biscuit layers and a filling. Stack the cake together.
- Then crumb coat it for an even surface. You can use any icing. Follow our tips for How to Crumb Coat a cake.
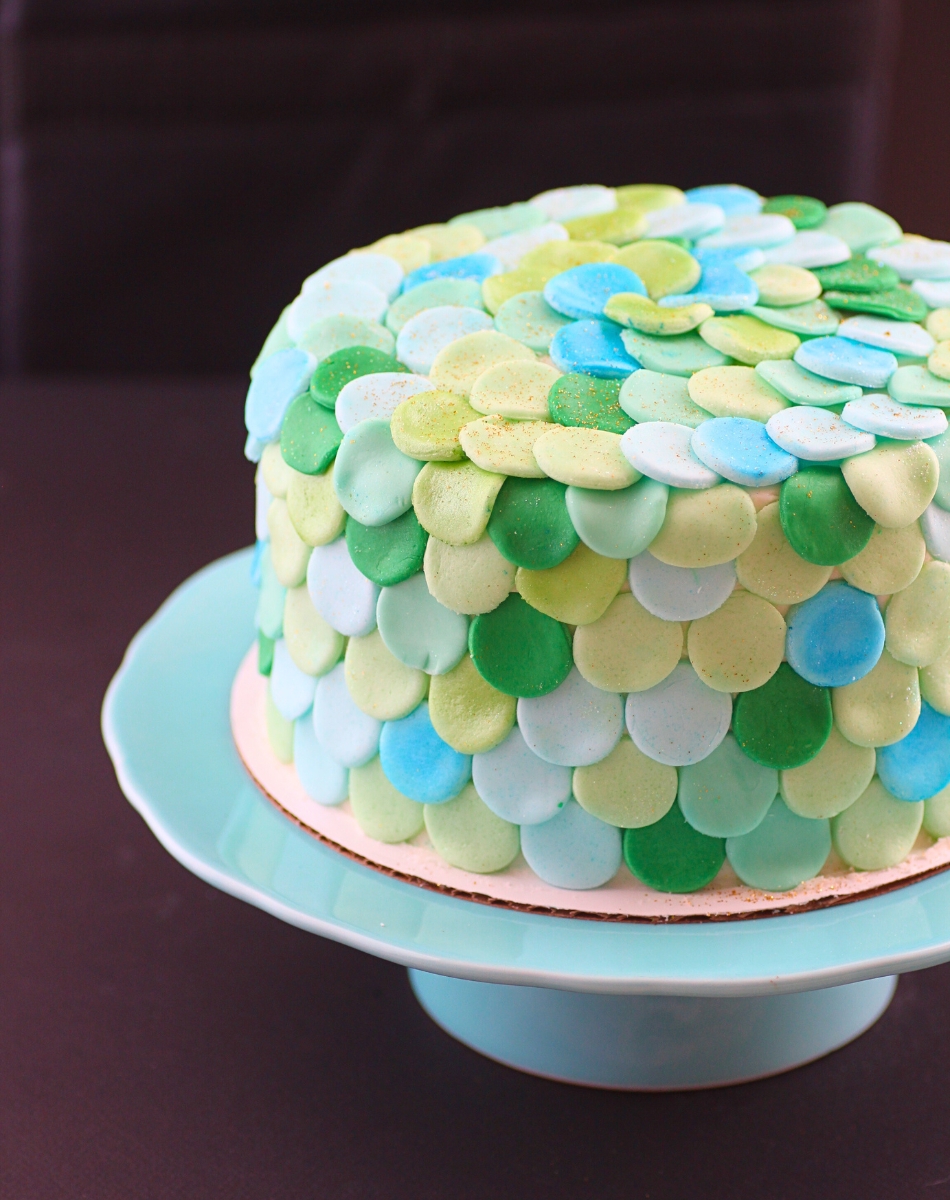
- Once the cake has a nice, clean crumb coat on, prepare the Jello Fondant for the mermaid scales. Now it will take around 2 hours to decorate your cake. The design is close to my petal cake, but the little circles are bigger to resemble the typical mermaid tail style.
It does take some time to cut out all the little circles, and yes, that was a bit of tedious. However, the results were amazing and the shining eyes of all the party guests are all worth it.

How to get the colors
I used the green and blue fondant that was colored with the jello, but I also supplemented the dark green and light turquoise/ sea-foam color from some premade fondant. I really like the added color intermixed.
The brighter blue and green color was achieved by added pearl dust to the circles. In all, there are six different shades of green and blue on this cake. Then, just to add a little extra sparkle, I added some gold disco dust
over top. Just because every birthday cake should shimmer!

This tutorial is for the cake design. You will need to have a layer cake of your choosing finished and ready. Find your favorite recipe for different layer cakes here.
Ingredients
- 1 9" Layer Cake Recipe
- 10 cups Jello Fondant Recipe
- Luster Dust
- Green Fondant
- Teal Fondant
- Shortening
Step by Step
- Have your cake, crumb coated with frosting of your choice in the fridge and ready. Also have your jello fondant ready for use.
- Prepare your plastic mat with a thin layer of shortening to prevent the fondant from sticking.Prepare your fondants.
- Break off a chunk of the jello fondant (a little larger than a golf ball) and warm it up in your hands. Roll smooth using the guides on the roller to get it even. Use the piping tip to cut out circles.

- Set half aside and add a thin layer of luster dust over them with a dry paint brush.
- Continue to make circle cut-outs with all the other fondant colors you intend to use. I used about 75% more jello fondant than premade fondant.

- Now start arranging them at the bottom of the cake and randomly add circles to the base. They should stick to the buttercream frosting without need for any other adherent.
- Offset the second row and continue around the cake. I had 5 rows going around my cake, the last one, bending over from the top down the side.

- For the top, start at the outer perimeter and go around in an overlapping fashion. Continue to build toward the center, then overlap the final circles in the center as best as possible.
- Cover and refrigerate until ready to sing Happy Birthday.


Images, text and all other content Copyrighted©Karyn Granrud, Susanne Queck and Wunderlander Verlag LLC, or ©Pro Stock Media via Canva.com. Unlicensed republishing permitted. As an Amazon affiliate, we earn on qualified purchases.