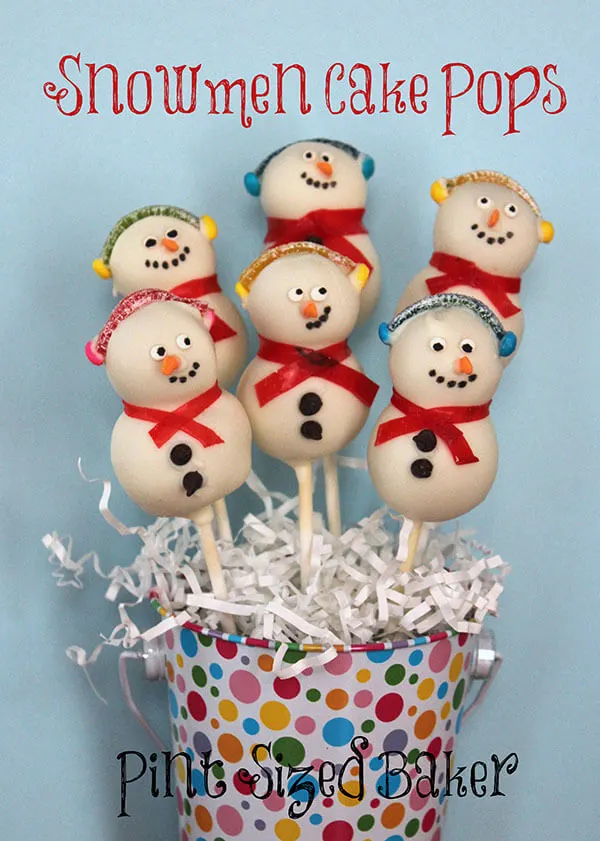
Wow! These Snowman Cake Pops are perfect for the whole winter season! I love that you can make them for both Christmas and winter! It is all about a hot tea, warm fuzzy slippers, and the fireplace!

How to Make these Snowmen
These little guys are very easy to make and I have seen so many different variations of them all over Facebook. You can make just the heads. Give him a three piece body. Add a top hat, Santa hat or a beanie hat. Make a more ruffled or longer scarf. The possibilities are up to you and your creativity!
Basic Cake Pop Batter
To make 6 snowmen, you’ll need 1/4 of a 9 x 13 cake and mix it with a tablespoon of frosting to make your cake pop batter. Use a paddle attachment in your mixer for best results. Check out this video on making cake pop batter.
Decoration
Get candy to decorate your snowman. I used a fruit roll up for the scarves, sour rainbow candy and candy buttons for the earmuffs, orange hearts for the noses, and small flat sprinkles for the eyes and buttons. You can use many different candies for the outfits and accessories.

These little guys were easy to make. I hope that you find some time to make some with your kids over the Christmas break. Here are a few more Christmas Cake Pop Ideas: Snow Globes, Snowflakes, Gingerbread Truffles
Enjoy! And Stay Warm!
Snowman Cake Pops

These Snowman Cake Pops are perfect for the whole winter season! I love that you can make them for both Christmas and winter.
Ingredients
For the Cake Pop Dough
- 1/4 of a baked 9 x 13 cake
- 1 – 3 tablespoon frosting
For the decorations
- White candy melts
- Fruit roll up for the scarves
- Sour rainbow candy and candy buttons for the earmuffs
- Orange hearts for the noses
- Small flat sprinkles for the eyes and buttons
- Mini chocolate chips for buttons
Instructions
- Make 9 1-inch balls, set six aside and cut the remaining 3 in half. The six large balls are for the body and the smaller ones are for their heads.
- Roll the cake pop batter smooth and place it on a cookie sheet lined with wax paper. Then place it in the fridge.
- Melt your candy melts according to directions. AVOID overheating the candy. Melt in the microwave at 70% power and stir every 30 seconds.
- Once the candy is melted, remove balls from fridge and get 6 lollipop sticks. Dip 1/4 inch of the stick into the candy and push the cake ball all the way through until a 1/4 to 1/3 inch is visible.
- Dip the tip of the stick up the the cake ball and then add the smaller pop to the top. Stand up to dry.
- Complete all “bodies” and allow to dry.
- Have candy ready to go! Lay it out because you’ll be working fast.
- Completely dip the cake pop and tap off the excess. Work quickly and add the headband, earmuffs, eyes and buttons. If you find it to difficult to add while wet, add the candy after it’s dry using wet candy as glue.
- To complete the faces, I used a food coloring writing pen to make the mouth and eyes.
Recommended Products
As an Amazon Associate and member of other affiliate programs, I earn from qualifying purchases.
Here’s a few more Christmas Cake Pop ideas for you!
How to Make Christmas Tree Cake Pops
Simple Christmas Tree Cake Pops
Images, text and all other content Copyrighted©Karyn Granrud, Susanne Queck and Wunderlander Verlag LLC, or ©Pro Stock Media via Canva.com. Unlicensed republishing permitted. As an Amazon affiliate, we earn on qualified purchases.

These are the cutest things ever! I love your site and everything you bake! I have put this on my facebook page and am going to pin it also!
Cynthia at http://FeedingBig.com
O my goodness! These are too, too cute! Would love if you'd join our Countdown to Christmas link party! Hope to see you there! Have a great week! 🙂
http://dixie-n-dottie.blogspot.com/2012_12_04_archive.html
Your snowmen pops turned out so well! Darling!
omg!!! so cute… i don't know how i can eat them…lol
These look amazing! Stopping by via The Country Cook. If you haven't already, I would love for you to come share at my Farm Girl Blog Fest: http://fresh-eggs-daily.blogspot.com/2012/12/farm-girl-friday-blog-fest-12.html
Lisa
Fresh Eggs Daily
Very cute, Karyn! Thanks for sharing at Foodie Friends Friday!
So cute, Karyn! I love the ones with the side smirk! I made some snowman cake pops recently too. The biggest challenge I had was getting the top cake pop to stay on the bottom one but I just used the candy coating to hold them together. Good thinking putting the stick all the way through both!
These are so dang cute! Great job 🙂
These are adorable! I totally wish I lived there so I could go to your class. It sounds amazing. Lucky West Virginia folks!
Those are so stinking adorable! Wish I lived close enough to come to the class!!!
Very cute!!!!!
Super Cute!!!
These guys are too cute. And the video is great! You make it look easy!
So so so cute! Thanks for all the info my only attempt at cake pops ended badly – may have another go 🙂
These are darling!! Stopping by from Mop It Up Mondays blog hop.
Thanks
Angie
godsgrowinggarden.com
Love these! Much better than a box kit. You are SO talented!
Wow are you talented! These little snowmen just make me giddy all over! I will have to try these! I would be thrilled to have you share these at my party going on!
http://www.pincushioncreations.com/2012/12/homemade-by-you-41.html
This looks so tasty! Yummers☺ You make Whimsy Wednesday look so good!
Thanks for joining us,
Kelly at Smart! School {House}
http://www.smartschoolhouse.com
These snowmen look SO nice. I have tried making cake pops on 2 separate occasions and I never get it right. The candy doesn't melt that well. It's not drippy like liquid. It's lumpy and dries fast. I never get even 1 cake ball to be covered evenly. I have to spoon it on and it appears lumpy. I keep puttign it in the microwave for 30 second intervals and stirring but it just ends up stuck to the spoon or stick and never flows like it's supposed to, so I gave up on trying this. i have wasted too much money on it already.
Oh my, these are SO ADORABLE! I will definitely have to show them to my sister… and pin them. 🙂
ahumblebumble.blogspot.com
So cute. These are going to be great to make with my grandkids. Please come share them with my readers at my Wicked Good Wednesday Blog Party at the Wilderness Wife Blog. I know my readers would love them. http://www.wildernesswife.com/?p=1297
These are beautiful!
These are so cute! I haven't tried making cake pops yet, but these make me want to.:)
Yup, these are pretty much the epitome of perfection! these little pops look fantastic!
I think in your recipe that you meant to say "stir your white chocolate every 3 minutes white melting it in the microwave oven," not every thirty 30 minutes?
Oh my… Thanks so much. It should be 30 SECONDS!
these are totally CUTE Karyn! 🙂
This is such a cute idea! Just had to pin it 🙂
Thank you so much for sharing your awesome recipe with Full Plate Thursday. Hope you are having a great day and come back real soon!
Miz Helen
Oh, Karyn! These are awesome!!!! SO cute and such a yummy treat, too! I have definitely NOT mastered the cake pop covering – the balls always seem to fall into the coating or I never get it completely covered. Will have to work on that. Thanks for sharing at Wicked Good Wednesdays! Hope to see you again tomorrow!